在 Go 语言中,除了之前说过的 WaitGroup 以外,还有一个很重要的控制 goroutine 执行的功能就是 Context,它是一个方便被用于控制很多个 goroutine 的功能,本篇来分析一下 Context 的实现。
Context
结构定义
Context 本身并不是一个结构体,只是一个接口,它的内部构造很简单,只包含了四种方法。
1
2
3
4
5
6
|
type Context interface {
    Deadline() (deadline time.Time, ok bool)
    Done() <-chan struct{}
    Err() error
    Value(key any) any
}
|
- Deadline() 的作用是返回终止时间和是否设置了终止时间。
- Done() 返回的是一个 channel,当 channel 被关闭时,说明任务结束了,相应的 goroutine 需要终止自己的运行。
- Err() 在 Done 返回的 channel 还未被关闭时被调用只会返回 nil,在这个 channel 被关闭以后被调用则会返回关闭的原因。
- Value(key any) 返回与 Context 相关联的一个键值对中,与参数 key 对应的 value。
树形结构
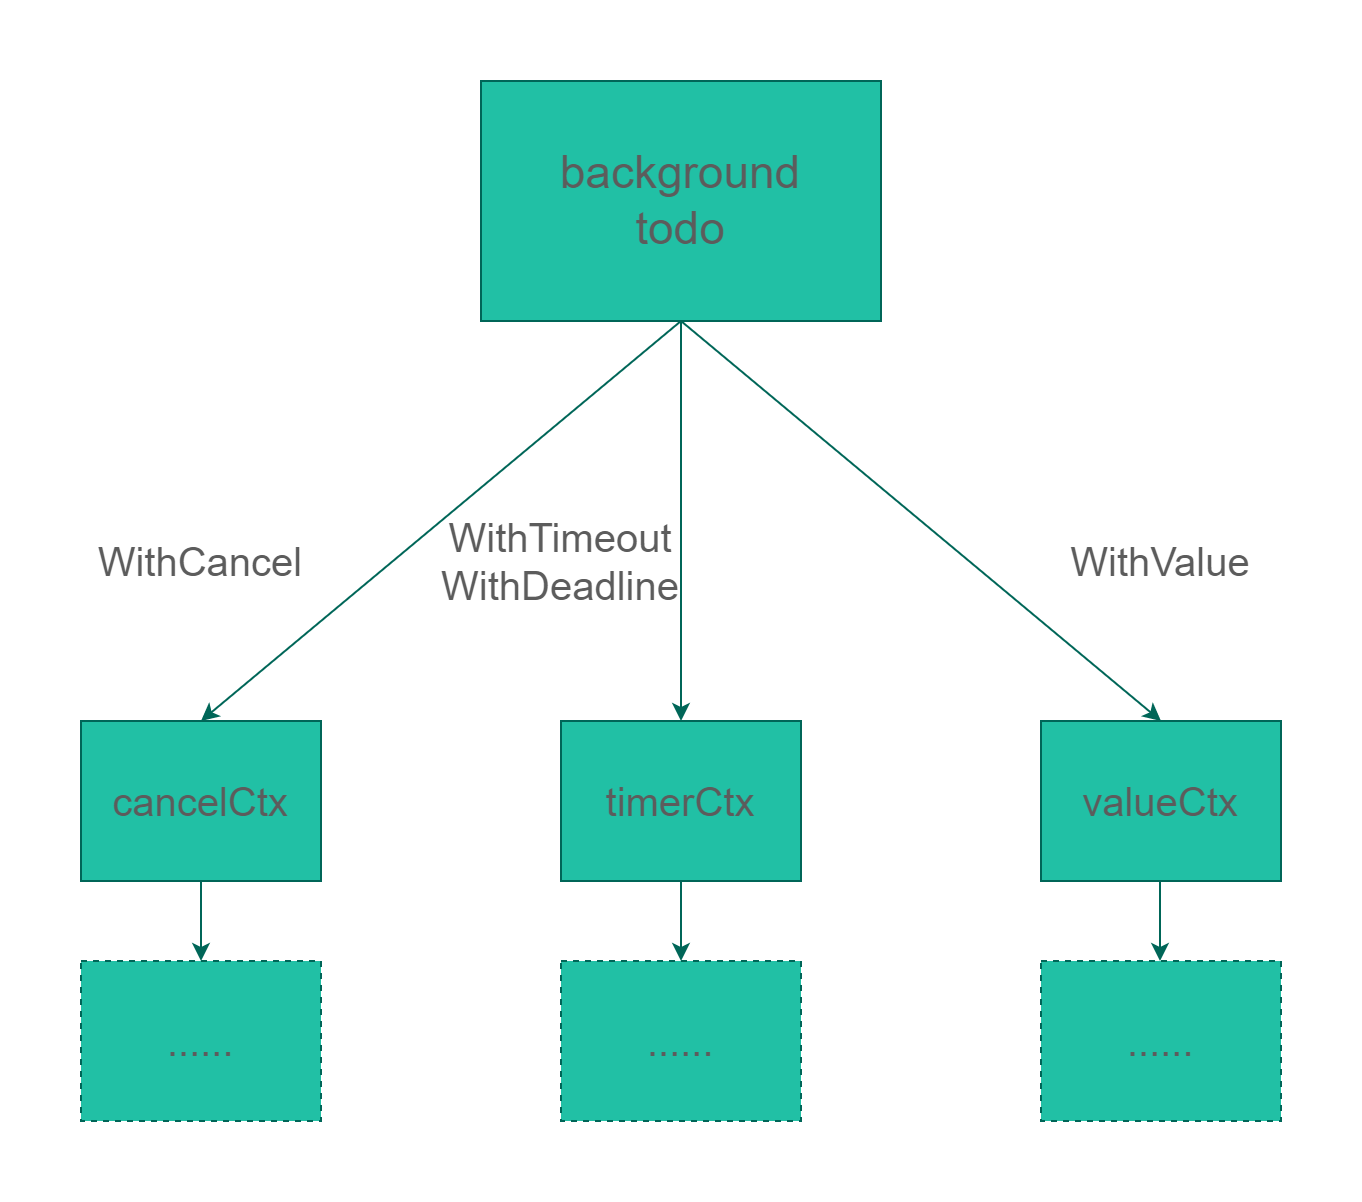
Context 是存在层级关系的,它通过一个树形结构来维护自身的层级。第一级的 Context 一般会使用 package 提供的 background,后续可以通过一些方法来以 background 为父节点,生成子节点。每种 Context 的实现都有自己对应的一种或两种方法,后面会看到。
emptyCtx
标准库贴心的为用户提供了一个 Context 接口的基本实现 emptyCtx,emptyCtx 只是一个最简单的实现,对 Context 中四个方法的实现都是直接返回,没有做任何处理。
 1
 2
 3
 4
 5
 6
 7
 8
 9
10
11
12
13
14
15
16
17
18
19
20
21
22
23
24
25
26
|
type emptyCtx int
func (*emptyCtx) Deadline() (deadline time.Time, ok bool) {
    return
}
func (*emptyCtx) Done() <-chan struct{} {
    return nil
}
func (*emptyCtx) Err() error {
    return nil
}
func (*emptyCtx) Value(key any) any {
    return nil
}
func (e *emptyCtx) String() string {
    switch e {
    case background:
        return "context.Background"
    case todo:
        return "context.TODO"
    }
    return "unknown empty Context"
}
var (
    background = new(emptyCtx)
    todo       = new(emptyCtx)
)
|
标准库中还定义了两个 emptyCtx 类型的全局变量 background 和 todo,通过定义的方法可以看到,这两个变量在功能上并无任何区别,只是语义上的区分。
background 和 todo 一般用作后续要介绍的几种 Context 的父类。这两个变量并不是直接导出的,需要通过对外的包裹函数进行获取。可以使用 Background 方法拿到 background,也可以使用 TODO 拿到 todo,这两个方法都是直接返回了对应的变量。
1
2
3
4
5
6
7
|
func Background() Context {
    return background
}

func TODO() Context {
    return todo
}
|
cancelCtx
用法示例
cancelCtx 是一种可以被取消的 Context,来看一个它的简单示例。
 1
 2
 3
 4
 5
 6
 7
 8
 9
10
11
12
13
14
15
16
17
18
19
20
21
22
23
24
25
|
func createChild(index int, ctx context.Context) {
    func() {
        for {
            select {
            case <-ctx.Done():
                println("goroutine", index, " over!")
                return
            }
        }
    }()
}

func main() {
    ctx1, cancel1 := context.WithCancel(context.Background())
    ctx2, cancel2 := context.WithCancel(ctx1)
    ctx3, cancel3 := context.WithCancel(ctx2)
    go createChild(1, ctx1)
    go createChild(2, ctx2)
    go createChild(3, ctx3)
    time.Sleep(1 * time.Second)
    cancel1()
    cancel2()
    cancel3()
    time.Sleep(1 * time.Second)
}
|
示例中首先使用 background 作为父节点创建了 ctx1,然后使用 ctx1 作为父节点创建了 ctx2,又用 ctx2 作为父节点创建了 ctx3。然后创建三个 goroutine,第一个监听 ctx1,第二个监听 ctx2,第三个监听 ctx3。
使用 WithCancel 创建 cancelCtx 时的第二个返回值是一个函数,可以用于取消本 cancelCtx 以及所有从本 cancelCtx 派生出的子节点和孙节点,这是 cancelCtx 最重要的一个用法,它使得 cancelCtx 可以非常方便的关闭一组 goroutine 的执行。
在本例中,如果只调用 cancel1 则三个 goroutine 都会结束,如果只调用 cancel2 则只有 2 和 3 会结束,如果只调用 cancel3 则只有 3 会结束。
结构定义
cancelCtx 的结构并不复杂,如下所示。
1
2
3
4
5
6
7
8
|
type cancelCtx struct {
    Context

    mu       sync.Mutex
    done     atomic.Value
    children map[canceler]struct{}
    err      error
}
|
它除了继承了 Context 接口以外,还有四个字段。
mu sync.Mutex 一把锁,用于保护后面的三个字段done atomic.Value 一个原子变量,用来保存控制 goroutine 的 channelchildren map[canceler]struct{} 一个 map,用来保存所有子节点的指针err error 用来保存错误信息
创建
之前的例子中也看到了,创建一个 cancelCtx 的方法是使用 context package 的导出函数 WithCancel。
 1
 2
 3
 4
 5
 6
 7
 8
 9
10
11
12
|
func WithCancel(parent Context) (ctx Context, cancel CancelFunc) {
    if parent == nil {
        panic("cannot create context from nil parent")
    }
    c := newCancelCtx(parent)
    propagateCancel(parent, &c)
    return &c, func() { c.cancel(true, Canceled) }
}

func newCancelCtx(parent Context) cancelCtx {
    return cancelCtx{Context: parent}
}
|
WithCancel 需要传入一个 Context 类型的参数 parent,这个参数会用来初始化 cancelCtx 中的 Context 部分,这个 parent 一般不需要库的使用者自己创建,而是使用 package 提供的 background 或 todo 全局变量传入即可。
propagateCancel 是一个比较长的函数,但是进行的操作并不复杂,主要是做了一个分支判断。
 1
 2
 3
 4
 5
 6
 7
 8
 9
10
11
12
13
14
15
16
17
18
19
20
21
22
23
24
25
26
|
func propagateCancel(parent Context, child canceler) {
    // ... 省略非关键代码

    if p, ok := parentCancelCtx(parent); ok { // 判断 parent 是否为 cancelCtx
        p.mu.Lock() // 加锁
        if p.err != nil {
            // parent has already been canceled
            child.cancel(false, p.err)
        } else {
            if p.children == nil {
                p.children = make(map[canceler]struct{})
            }
            p.children[child] = struct{}{} // 将 child 保存在 parent 中
        }
        p.mu.Unlock() // 解锁
    } else {
        atomic.AddInt32(&goroutines, +1)
        go func() { // 额外创建一个 goroutine 在父节点取消的时候取消子节点
            select {
            case <-parent.Done():
                child.cancel(false, parent.Err())
            case <-child.Done():
            }
        }()
    }
}
|
在 propagateCancel 中,会对 parent 的类型进行判断,如果是 cancelCtx 或其派生类,则会将本节点作为 child 保存在 parent 的 children 这个 map 中。否则会再额外创建一个 goroutine 来监听 parent 的 Done 从而取消 child 的运行。
取消
WithCancel 返回的取消函数只是简单的对 cancelCtx 的 cancel 方法的封装。cancel 方法接受一个 bool 值 removeFromParent 表示结束是否要将本节点从父节点的 map 中移除,err 用来保存结束的原因。
 1
 2
 3
 4
 5
 6
 7
 8
 9
10
11
12
13
14
15
16
17
18
19
20
21
22
|
func (c *cancelCtx) cancel(removeFromParent bool, err error) {
    // ... 省略非关键代码
    c.mu.Lock()
    // ... 省略非关键代码
    c.err = err
    d, _ := c.done.Load().(chan struct{})
    if d == nil { // 如果没有调用过 cancelCtx.Done 则这里为 nil
        c.done.Store(closedchan)
    } else { // 如果有地方调用过 cancelCtx.Done 则说明 channel 在被监听
        close(d) // 关闭 channel,通知所有监听的 goroutine
    }
    for child := range c.children { // 取消所有子节点
        // NOTE: acquiring the child's lock while holding parent's lock.
        child.cancel(false, err)
    }
    c.children = nil // 清空子节点
    c.mu.Unlock()

    if removeFromParent {
        removeChild(c.Context, c)
    }
}
|
cancel 被调用以后主要做了下面这几件事情。
- 保存 Context 被取消的原因
- 关闭在 done 中保存的 channel 来通知所有正在监听的 goroutine
- 遍历 children map,通知每一个 child 执行取消操作
- 将自己的 children map 清空
- 根据 removeFromParent 的值判断是否要将自己从父节点上移除,只有最外层为 true
总结
从 cancel 的实现中可以发现,context 并不是新的机制,它是在 channel 的上层进行了一次封装,控制 goroutine 执行的本质上还是 context 持有的 channel。
在执行 cancel 以后,done 保存的 channel 会被关闭,children map 也会被清空,所以 Context 不能被复用,再次使用要创建新的对象。
timerCtx
用法示例
timerCtx 用于定时关闭 goroutine 的执行。
 1
 2
 3
 4
 5
 6
 7
 8
 9
10
11
12
13
14
15
16
17
18
19
20
21
|
func createChild(index int, ctx context.Context) {
    func() {
        for {
            select {
            case <-ctx.Done():
                println("goroutine", index, " over!")
                return
            }
        }
    }()
}

func main() {
    ctx1, _ := context.WithTimeout(context.Background(), 1*time.Second)
    ctx2, _ := context.WithCancel(ctx1)
    ctx3, _ := context.WithCancel(ctx2)
    go createChild(1, ctx1)
    go createChild(2, ctx2)
    go createChild(3, ctx3)
    time.Sleep(2 * time.Second)
}
|
稍微改一下 cancelCtx 的例子即可,这里让 ctx1 在 1s 以后执行 cancel,同时 ctx2 派生自 ctx1,ctx3 派生自 ctx2。等 ctx1 执行 cancel 以后,三个 goroutine 都会触发返回。
结构定义
1
2
3
4
5
|
type timerCtx struct {
    cancelCtx
    timer *time.Timer
    deadline time.Time
}
|
timerCtx 的主要内容都是继承自 cancelCtx,只在 cancelCtx 的基础上新增了两个字段。
timer *time.Timer 是用于计时的计时器。deadline time.Time 保存了计时的时间。
创建
timerCtx 有一个不太一样的地方,它有两个可以用来创建的导出函数,WithTimeout 和 WithDeadline。由于前者只是对于后者的简单调用,所以只看 WithDeadline 的实现即可。
 1
 2
 3
 4
 5
 6
 7
 8
 9
10
11
12
13
14
15
16
17
18
19
20
21
22
23
24
25
26
27
28
|
func WithDeadline(parent Context, d time.Time) (Context, CancelFunc) {
    if parent == nil {
        panic("cannot create context from nil parent")
    }
    if cur, ok := parent.Deadline(); ok && cur.Before(d) {
        // 如果 parent 的到期时间比当前要创建的到期时间更早
        // 此时已无必要再对新的时间进行定时,当作普通的 cancelCtx 处理即可
        return WithCancel(parent)
    }
    c := &timerCtx{
        cancelCtx: newCancelCtx(parent),
        deadline:  d,
    }
    propagateCancel(parent, c) // 绑定 parent 和 child
    dur := time.Until(d)
    if dur <= 0 {
        c.cancel(true, DeadlineExceeded) // deadline has already passed
        return c, func() { c.cancel(false, Canceled) }
    }
    c.mu.Lock()
    defer c.mu.Unlock()
    if c.err == nil {
        c.timer = time.AfterFunc(dur, func() { // 创建定时器
            c.cancel(true, DeadlineExceeded) // 执行取消
        })
    }
    return c, func() { c.cancel(true, Canceled) }
}
|
WithDeadline 除了接受 parent 参数外还需要接受一个过期时间,返回的内容与 WithCancel 一致,也会返回 cancel 方法,可供手动调用。
取消
 1
 2
 3
 4
 5
 6
 7
 8
 9
10
11
12
13
|
func (c *timerCtx) cancel(removeFromParent bool, err error) {
    c.cancelCtx.cancel(false, err)
    if removeFromParent {
        // Remove this timerCtx from its parent cancelCtx's children.
        removeChild(c.cancelCtx.Context, c)
    }
    c.mu.Lock()
    if c.timer != nil {
        c.timer.Stop() // 终止定时器
        c.timer = nil
    }
    c.mu.Unlock()
}
|
timerCtx 的 cancel 方法并没有多少新东西,相比 cancelCtx 的 cancel 方法,额外步骤就是处理定时器终止。
总结
由于 timerCtx 的大部分结构都是继承自 cancelCtx,本身的功能也只是为 cancelCtx 增加了一个定时器,所以在上面的实现源码中可以看出,并无多少新增的操作。
valueCtx
用法示例
valueCtx 的作用似乎与前两者相比更加符合 Context 的定义,它不是用来控制 goroutine 运行的,而是用来传递数据的。
 1
 2
 3
 4
 5
 6
 7
 8
 9
10
11
12
13
14
|
func main() {
	back := context.Background()
	ctx1 := context.WithValue(back, "key1", "111")
	ctx2 := context.WithValue(ctx1, "key2", "222")
	ctx3 := context.WithValue(ctx2, "key3", "333")
	ctx4 := context.WithValue(back, "key4", "444")

	fmt.Printf("ctx3 key1 is %v\n", ctx3.Value("key1"))
	fmt.Printf("ctx3 key2 is %v\n", ctx3.Value("key2"))
	fmt.Printf("ctx3 key3 is %v\n", ctx3.Value("key3"))

	fmt.Printf("ctx4 key1 is %v\n", ctx4.Value("key1"))
	fmt.Printf("ctx4 key4 is %v\n", ctx4.Value("key4"))
}
|
valueCtx 一样是有层级关系的,上面这段代码的输出如下:
1
2
3
4
5
|
ctx3 key1 is 111
ctx3 key2 is 222
ctx3 key3 is 333
ctx4 key1 is <nil>
ctx4 key4 is 444
|
可以看到在 ctx3 中,包含了其自身以及所有父节点中保存的值,在 ctx4 中则只有它自身的值。
创建
创建一个 valueCtx 的方法是 context package 的 WithValue,它除了要求一个父节点作为参数以外,还要求传入一对键值对,它保存的数据就是创建时传入的键值对。
1
2
3
4
|
func WithValue(parent Context, key, val any) Context {
	// ... 省略非关键代码
	return &valueCtx{parent, key, val}
}
|
WithValue 的内部实现非常简单,在进行过参数的合法性判断以后,直接使用参数创建了一个 valueCtx 对象并返回其指针。
结构
1
2
3
4
|
type valueCtx struct {
	Context
	key, val any
}
|
valueCtx 的结构也很简单,除了继承 Context 的接口实现以外,只有两个 any 对象 key 和 val。
此处可以看出一些小端倪,在 valueCtx 中并没有锁,一个可以被并发读取但是没有锁的非原子变量,说明了 valueCtx 中的值一定是不可改变的。
取值
通过 Value 方法来取 valueCtx 中对应 key 的 value。
 1
 2
 3
 4
 5
 6
 7
 8
 9
10
11
12
13
14
15
16
17
18
19
20
21
22
23
|
func (c *valueCtx) Value(key any) any {
	if c.key == key {
		return c.val
	}
	return value(c.Context, key)
}

func value(c Context, key any) any {
	for {
		switch ctx := c.(type) {
		case *valueCtx:
			if key == ctx.key {
				return ctx.val
			}
			c = ctx.Context
		// ... 省略非关键代码
		case *emptyCtx:
			return nil
		default:
			return c.Value(key)
		}
	}
}
|
在 Value 中对参数 key 与 valueCtx 保存的 key 进行了一次比较,如果相等则直接返回 valueCtx 保存的 val 即可。
如果 key 不是本 valueCtx 保存的值,那么会在 for 循环中一直递归向上查找所有父节点。如果找到了对应的 key 则返回 val,如果一路查到了 emptyCtx,也就是 background,那么说明整条链上都没有相符和 key,则返回 nil 即可。
总结
valueCtx 的实现很简单,每个 valueCtx 保存了一对不可变更的键值对。在取值查找的时候,会查找自身及所有父节点。