Redis 从 6.0 开始已经支持多线程 IO 了,网络模型变得比之前单线程的时候复杂了一些,本篇尝试分析一下 Redis 网络模型的变化。所有出现的代码均为 Redis 7.0 版本的。
为什么坚持单线程
Redis 在流行的中间件中一直是一个异类,它居然一直是用单线程进行网络 IO 的。所有的消息过来以后,原地解析消息获得命令,并且执行命令。
官网给出的原因是,造成 Redis 瓶颈的原因大部分情况下都是内存和网络,如果一般只使用 O(N) 或 O(log(N)) 方法的话,CPU 不会成为瓶颈。
个人感觉可能是为了控制代码实现的复杂度,而且引入锁机制以后可能在很多地方因为锁竞争反而会造成性能的下降。
为什么又上了多线程
Redis 并不是从 6.0 才开始使用多线程的,其实从 4.0 开始就已经引入了多线程来执行一些异步操作,但是这些线程并不参与到网络模型中,而是专门用来处理一些比较重的任务,比如像 UNLINK,BGSAVE, FLUSHALL SYNC 等。这类线程为 Redis 带来了异步操作的支持,解决了一些很重的任务会给整个服务带来长时间的卡顿问题。
从 6.0 开始,Redis 正式在网络模型中加入了多线程支持,主要还是为了优化性能的原因,虽然 Redis 的性能本来就很好,但是性能优化只有更好。在官方给出的配置示例的注释里,指明了使用 I/O 线程可以给 Redis 带来两倍的性能提升。
不过 Redis 官方目前还是没有默认开启 I/O 线程,需要在配置里开启才行。
1
2
|
io-threads 4
io-threads-do-reads yes
|
io-threads 用于指明想要开启的 I/O 线程数量,配置的注释里说明了开太多线程并不会带来性能的线性增长,超过 8 个 I/O 线程以后带来的性能增长就很不明显了。
io-threads-do-reads 用来指明 I/O 线程是否可以用来读取数据,默认情况下 I/O 线程只用于写数据。将该选项设为 yes 即可使 I/O 线程同时用于数据读取。
单线程网络模型
直到现在,Redis 的网络模型在默认情况下依然是单线程的。下面这幅图是将这种模型的大致抽象画出的样子。
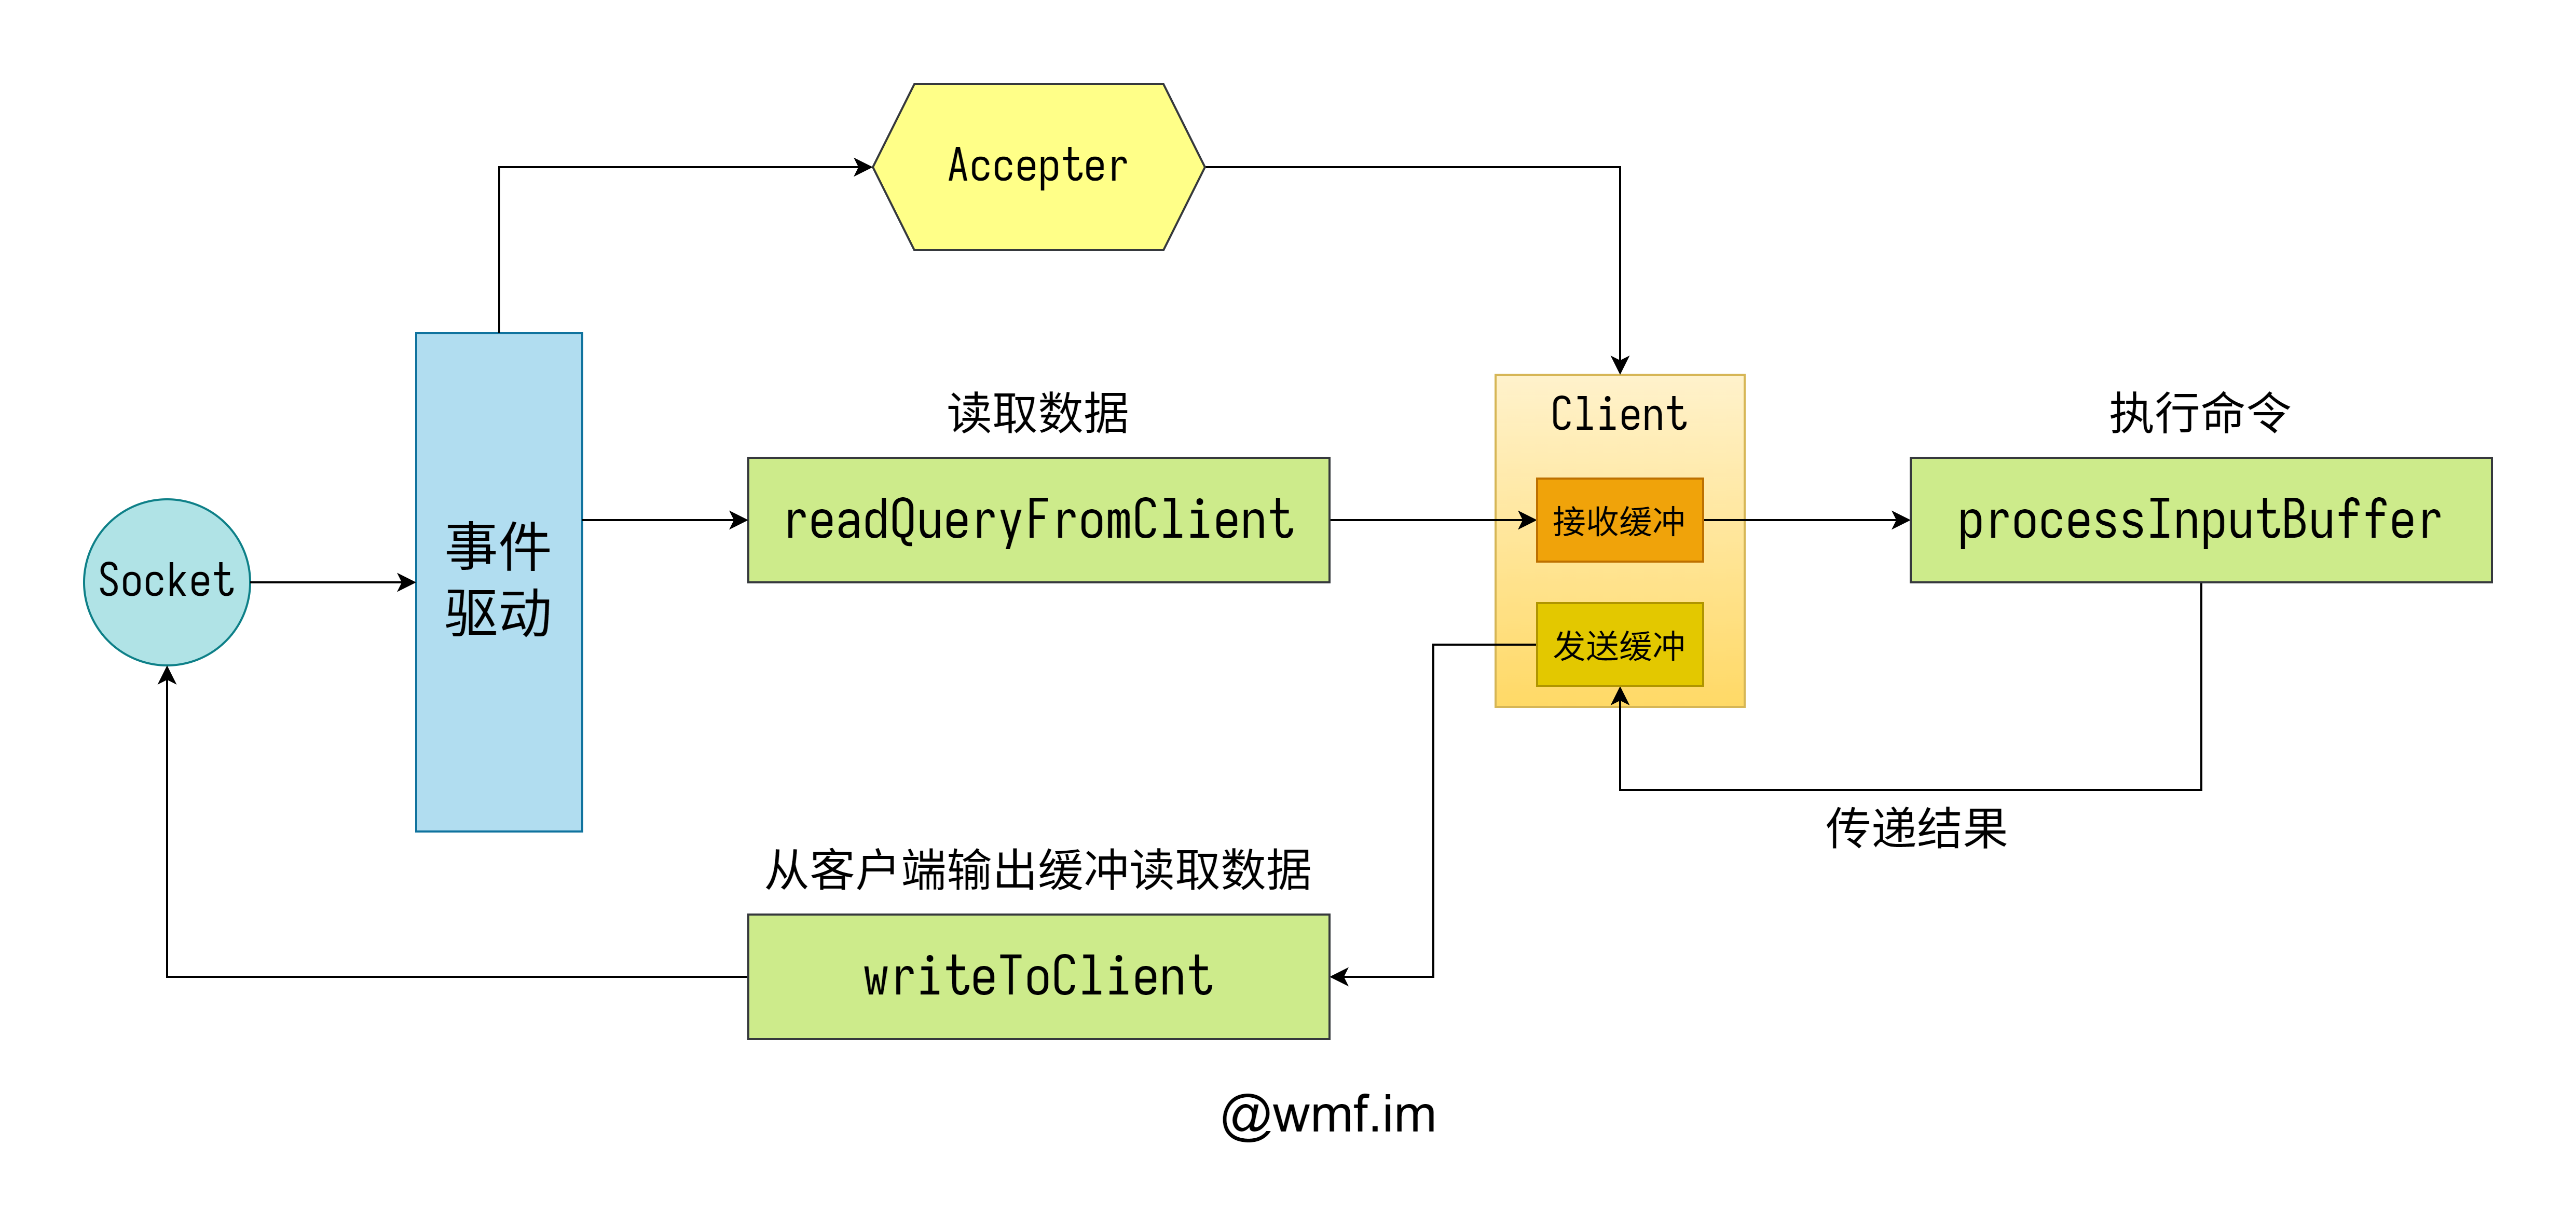
虽然这部分的代码已经很庞大了,但是整个模型抽象出来还是很简单的。整个模型是一个标准的基于 epoll reactor 实现的单线程网络模型。
当监听套接字上有消息过来的时候,会调用 Accepter 的回调来创建一个新的客户端,并且将客户端连接的消息回调函数设为 readQueryFromClient。
当客户端套接字上有消息过来的时候,会为其调用 readQueryFromClient 的消息回调。这个方法会将数据从 socket 套接字上读取出来,并且放入 client 的接收缓冲区中。然后执行 processInputBuffer 解析读取缓冲区中的内容,并且执行解析出的命令,并且将命令执行的结果放入 client 的发送缓冲区中。在稍后的事件循环中,会为每一个有数据需要发送的客户端执行 writeToClient,在这里直接使用 write 将数据发送给客户端。
多线程网络模型
多线程模式下也没有变化太多,应该是开发组在设计多线程网络模型的时候希望可以尽量复用单线程模型的处理方法。不过画图苦手已经有点顶不住了,::>_<::
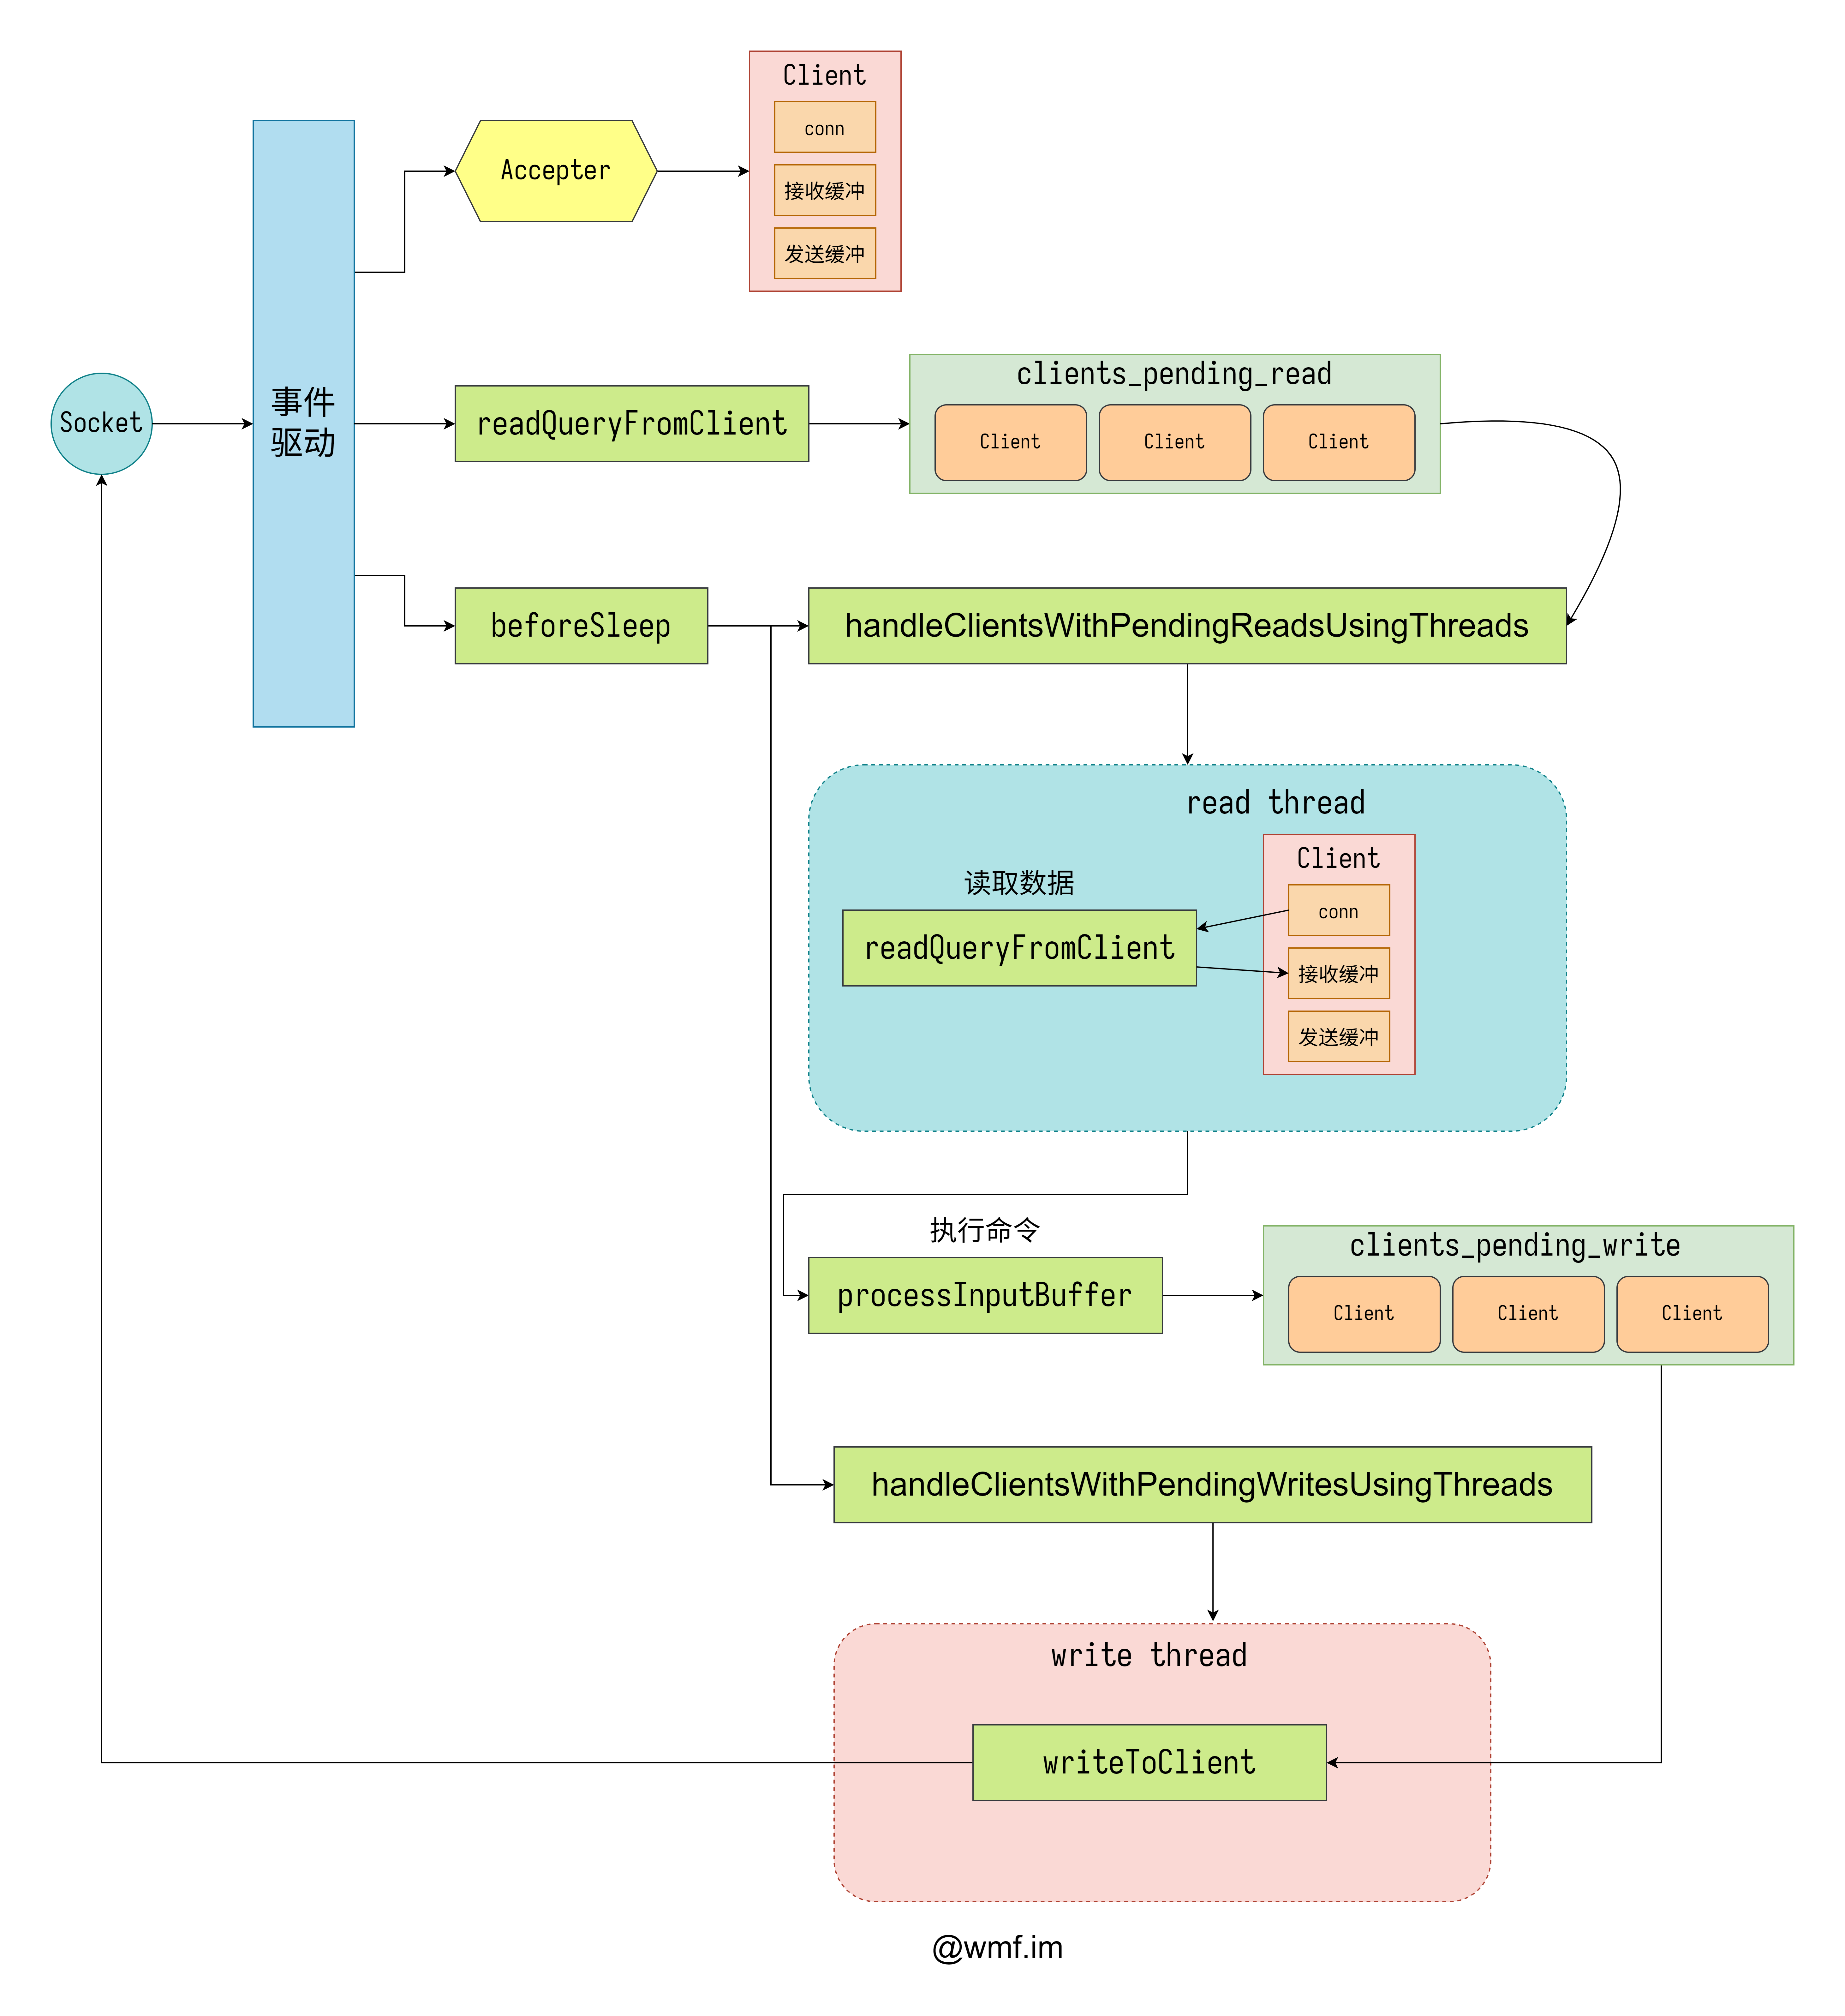
在多线程模式下,有两个比较重要的东西,一个等待读的客户端链表 clients_pending_read,还有一个等待写的客户端链表 clients_pending_write。其实它们在单线程模式上就已经有用上了,不过那时不太重要。
在处理读取的时候,使用 handleClientsWithPendingReadsUsingThreads,它将所有当前在 clients_pending_read 中的客户端按照线程数量进行了 N 等份,交给不同的线程进行处理,IO 线程为所有它需要处理的客户端调用 readQueryFromClient,不过跟单线程不同的地方是这一步并不会执行命令,只会给客户端加上一个有命令需要执行的标记。等所有线程都执行结束了,在主线程里会执行所有需要执行的命令。
在处理写入的时候,使用 handleClientsWithPendingWritesUsingThreads,它将所有当前在 clients_pending_write 中的客户端按线程数量分成了 N 等份,交给不同的线程进行处理。线程最终会调用到 writeToClient 把消息发送给客户端。
值得一提的是,当 IO 线程在工作的时候,主线程也没闲着,它在读取阶段充当了一个读线程,在写出阶段充当了一个写线程。在自己的任务处理完以后,主线程会等待其它线程的任务也都结束,然后才会继续后面的操作。
事件驱动器
整个 Redis 服务器的核心就是一个事件驱动器,Server 的 main 函数最终就是阻塞在了 aeMain 上,由此可见它的重要性。
结构
在每个 Redis Server 实例中,只有一个 eventloop,它是 aeEventLoop 结构的,负责处理整个 Server 中所有的事件。
 1
 2
 3
 4
 5
 6
 7
 8
 9
10
11
12
13
|
typedef struct aeEventLoop {
    int maxfd; // 已经注册过的最大 fd
    int setsize; // 最大可以处理的套接字个数
    long long timeEventNextId;
    aeFileEvent *events; // 使用数组保存了所有 fd 到 aeFileEvent 的映射关系
    aeFiredEvent *fired; // 触发的事件会被放在这里
    aeTimeEvent *timeEventHead;
    int stop;
    void *apidata; // epoll 相关的数据会在这里
    aeBeforeSleepProc *beforesleep;
    aeBeforeSleepProc *aftersleep;
    int flags;
} aeEventLoop;
|
aeEventLoop 的核心是 epoll,由于要支持多个系统的 poll 接口,所以 epoll 相关的数据是放在了 apidata 里面。
1
2
3
4
|
typedef struct aeApiState {
    int epfd;
    struct epoll_event *events;
} aeApiState;
|
如果使用 epoll 的话,那么在 apidata 里面存储的就是一个 aeApiState 结构的对象。在 aeApiState 中包含的就是 epoll 必备的 epfd 和 events 数组。
创建 eventloop
Redis Server 会在程序启动的初始化阶段,调用 aeCreateEventLoop 来创建自己的 eventloop 对象。
1
|
server.el = aeCreateEventLoop(server.maxclients + CONFIG_FDSET_INCR);
|
传入的参数除了一个固定的宏以外,还有就是配置中的 maxclients 字段的值,该字段如果不配置的话,默认是 10000。
 1
 2
 3
 4
 5
 6
 7
 8
 9
10
11
12
13
14
15
16
17
18
19
20
21
22
23
24
25
26
27
28
29
30
31
32
33
34
35
36
37
38
39
40
41
42
43
44
45
46
47
48
49
50
51
52
53
54
|
aeEventLoop *aeCreateEventLoop(int setsize) {
    aeEventLoop *eventLoop;
    int i;

    monotonicInit();    /* just in case the calling app didn't initialize */

    if ((eventLoop = zmalloc(sizeof(*eventLoop))) == NULL) goto err;
    eventLoop->events = zmalloc(sizeof(aeFileEvent)*setsize);
    eventLoop->fired = zmalloc(sizeof(aeFiredEvent)*setsize);
    if (eventLoop->events == NULL || eventLoop->fired == NULL) goto err;
    eventLoop->setsize = setsize;
    eventLoop->timeEventHead = NULL;
    eventLoop->timeEventNextId = 0;
    eventLoop->stop = 0;
    eventLoop->maxfd = -1;
    eventLoop->beforesleep = NULL;
    eventLoop->aftersleep = NULL;
    eventLoop->flags = 0;
    if (aeApiCreate(eventLoop) == -1) // 这里创建 epoll 对象
        goto err;
    /* Events with mask == AE_NONE are not set. So let's initialize the
     * vector with it. */
    for (i = 0; i < setsize; i++)
        eventLoop->events[i].mask = AE_NONE;
    return eventLoop;

err:
    if (eventLoop) {
        zfree(eventLoop->events);
        zfree(eventLoop->fired);
        zfree(eventLoop);
    }
    return NULL;
}

static int aeApiCreate(aeEventLoop *eventLoop) {
    aeApiState *state = zmalloc(sizeof(aeApiState));

    if (!state) return -1;
    state->events = zmalloc(sizeof(struct epoll_event)*eventLoop->setsize);
    if (!state->events) {
        zfree(state);
        return -1;
    }
    state->epfd = epoll_create(1024); /* 1024 is just a hint for the kernel */
    if (state->epfd == -1) {
        zfree(state->events);
        zfree(state);
        return -1;
    }
    anetCloexec(state->epfd); // 为 epfd 设置 FD_CLOEXEC,防止子进程的 fd 无法关闭
    eventLoop->apidata = state;
    return 0;
}
|
这里代码长了点,但是内容很简单,基本就是结构体 aeEventLoop 的初始化,以及 epoll 相关结构体 aeApiState 的创建。主要关注一下几点即可。
- 调用
aeCreateEventLoop 时传入的参数会被当作 aeEventLoop 的 setsize
aeEventLoop 的 events 变量是一个 aeFileEvent 结构的数组aeEventLoop 的 fired 变量是一个 aeFiredEvent 结构的数组- 在
aeApiCreate 中创建了 aeApiState 对象,并将其保存在了 apidata 中
文件事件结构
要增加对一个 socket 套接字的监听,要通过创建文件事件来实现。
上面提到了 aeEventLoop 的 events 变量是一个 aeFileEvent 结构的数组。这个 aeFileEvent 就是单个文件事件的对象了。在使用果成中不会去创建它,直接根据自己的 fd 从 events 中拿取使用即可。
1
2
3
4
5
6
|
typedef struct aeFileEvent {
    int mask; /* one of AE_(READABLE|WRITABLE|BARRIER) */
    aeFileProc *rfileProc; // 读套接字的方法
    aeFileProc *wfileProc; // 写套接字的方法
    void *clientData; // 保存了可以找到 client 对象的数据,为 conn 类型
} aeFileEvent;
|
关于这个结构需要注意的点是,因为要兼容多个系统,所以 mask 并没有直接使用 epoll 的 mask,而是自己定义了一套,会在系统相关的接口里进行转换。
所有事件驱动器都要解决的一个问题就是,触发了某个 fd 的事件以后怎么找到对应的 client,本结构的 clientData 中保存了一个 connection 的结构体,其中保存了 client 的指针。关于 connection 的结构在后面讲到 accept 的时候会解释。
创建文件事件
创建文件事件的接口是 aeCreateFileEvent。
 1
 2
 3
 4
 5
 6
 7
 8
 9
10
11
12
13
14
15
16
17
18
19
20
21
22
23
24
25
26
27
28
29
30
31
32
33
34
35
36
|
int aeCreateFileEvent(aeEventLoop *eventLoop, int fd, int mask, aeFileProc *proc, void *clientData) {
    if (fd >= eventLoop->setsize) {
        errno = ERANGE;
        return AE_ERR;
    }
    aeFileEvent *fe = &eventLoop->events[fd];

    if (aeApiAddEvent(eventLoop, fd, mask) == -1)
        return AE_ERR;
    fe->mask |= mask;
    if (mask & AE_READABLE)
        fe->rfileProc = proc;
    if (mask & AE_WRITABLE)
        fe->wfileProc = proc;
    fe->clientData = clientData;
    if (fd > eventLoop->maxfd)
        eventLoop->maxfd = fd;
    return AE_OK;
}

static int aeApiAddEvent(aeEventLoop *eventLoop, int fd, int mask) {
    aeApiState *state = eventLoop->apidata;
    struct epoll_event ee = {0}; /* avoid valgrind warning */
    int op = eventLoop->events[fd].mask == AE_NONE ? EPOLL_CTL_ADD : EPOLL_CTL_MOD;

    ee.events = 0;
    mask |= eventLoop->events[fd].mask; /* Merge old events */
    if (mask & AE_READABLE)
        ee.events |= EPOLLIN;
    if (mask & AE_WRITABLE)
        ee.events |= EPOLLOUT;
    ee.data.fd = fd;
    if (epoll_ctl(state->epfd, op, fd, &ee) == -1)
        return -1;
    return 0;
}
|
又是一堆源码,不过好在这一部分也很简单。只需要关注下面几点即可。
aeFileEvent 是通过 fd 从 events 数组中拿取的- 在
aeApiAddEvent 中将自定义的 mask 转为了 epoll 的 mask
- 使用
epoll_ctl 将 fd 加入到了 epfd 的监听中
- 根据希望监听的事件类型设置了
rfileProc 和 wfileProc
- 更新了
eventLoop->maxfd
驱动器阻塞
在 Redis 的 main 函数最后会调用 aeMain,它又调用了 aeProcessEvents,然后 aeApiPoll 又被调用,在 aeApiPoll 中使用了 epoll_wait 进行了阻塞。
 1
 2
 3
 4
 5
 6
 7
 8
 9
10
11
12
13
14
15
16
17
18
19
20
21
22
23
24
25
26
27
28
29
30
|
static int aeApiPoll(aeEventLoop *eventLoop, struct timeval *tvp) {
    aeApiState *state = eventLoop->apidata;
    int retval, numevents = 0;

    retval = epoll_wait(state->epfd, state->events, eventLoop->setsize, tvp ? (tvp->tv_sec * 1000 + (tvp->tv_usec + 999) / 1000) : -1);
    if (retval > 0) {
        int j;

        numevents = retval;
        for (j = 0; j < numevents; j++) {
            int mask = 0;
            struct epoll_event *e = state->events+j;

            if (e->events & EPOLLIN)
                mask |= AE_READABLE;
            if (e->events & EPOLLOUT)
                mask |= AE_WRITABLE;
            if (e->events & EPOLLERR)
                mask |= AE_WRITABLE|AE_READABLE;
            if (e->events & EPOLLHUP)
                mask |= AE_WRITABLE|AE_READABLE;
            eventLoop->fired[j].fd = e->data.fd;
            eventLoop->fired[j].mask = mask;
        }
    } else if (retval == -1 && errno != EINTR) {
        panic("aeApiPoll: epoll_wait, %s", strerror(errno));
    }

    return numevents;
}
|
当从 epoll_wait 中唤醒以后,aeApiPoll 主要做了两件事情。
- 将 epoll 的 mask 重新转为自定义的 mask
- 将触发的事件填充到
eventLoop 的 fired 中,等待后续处理
事件触发
在事件触发以后,会将相关信息填充到 eventLoop 的 fired 中,fired 是一个 aeFiredEvent 结构体的数组,来看一下 aeFiredEvent 的结构。
1
2
3
4
|
typedef struct aeFiredEvent {
    int fd;
    int mask;
} aeFiredEvent;
|
它的结构非常简单,只保存了 fd 和 mask。因为关于文件事件的数据都保存在了 aeFileEvent 中,而 aeFiredEvent 只需要保存可以指明后续要进行什么操作的数据即可。
通过 fd 可以从 events 中拿到对应的 aeFileEvent,而 mask 可以说明后续要执行哪个回调函数来进行操作。
事件执行
当 aeApiPoll 返回以后,它会返回触发的事件个数,同时 fired 数组也已经填充完毕,可以开始执行了。aeProcessEvents 是一个非常长的函数,下面是我简化过以后只保留了事件处理部分的代码。
 1
 2
 3
 4
 5
 6
 7
 8
 9
10
11
12
13
14
15
16
17
18
19
20
21
22
23
24
25
26
27
28
29
30
|
// 大量简化后的 aeProcessEvents
int aeProcessEvents(aeEventLoop *eventLoop, int flags) {
    int processed = 0, numevents;
    numevents = aeApiPoll(eventLoop, tvp); // 这里会调用 epoll_wait 阻塞

    // 处理本次 wait 返回触发的事件
    for (j = 0; j < numevents; j++) {
        int fd = eventLoop->fired[j].fd;
        aeFileEvent *fe = &eventLoop->events[fd];
        int mask = eventLoop->fired[j].mask;
        int fired = 0; /* Number of events fired for current fd. */
        if (fe->mask & mask & AE_READABLE) {
            fe->rfileProc(eventLoop, fd, fe->clientData, mask);
            fired++;
            fe = &eventLoop->events[fd]; /* Refresh in case of resize. */
        }

        /* Fire the writable event. */
        if (fe->mask & mask & AE_WRITABLE) {
            if (!fired || fe->wfileProc != fe->rfileProc) {
                fe->wfileProc(eventLoop,fd,fe->clientData,mask);
                fired++;
            }
        }

        processed++;
    }

    return processed; /* return the number of processed file/time events */
}
|
它遍历了 fired 中所有的触发事件,通过 fd 拿到了对应的 aeFileEvent *fe,又根据 mask 来判断是应该调用 fe->rfileProc 还是 fe->wfileProc,抑或是两者都需要调用。在最后它返回了总的被处理的事件个数。
创建客户端连接
绑定监听地址端口
Redis Server 绑定的地址和端口写在配置文件之中。官方给出的默认配置如下。
1
2
|
bind 127.0.0.1 -::1
port 6379
|
在 initServer 中,使用了 listenToPort 方法对每个地址和端口进行绑定。
 1
 2
 3
 4
 5
 6
 7
 8
 9
10
11
12
13
|
// 大量简化后的 listenToPort
int listenToPort(int port, socketFds *sfd) {
    int j;
    char **bindaddr = server.bindaddr;
    for (j = 0; j < server.bindaddr_count; j++) {
        char *addr = bindaddr[j];
        sfd->fd[sfd->count] = anetTcpServer(server.neterr, port, addr, server.tcp_backlog);
        anetNonBlock(NULL, sfd->fd[sfd->count]);
        anetCloexec(sfd->fd[sfd->count]);
        sfd->count++;
    }
    return C_OK;
}
|
精简过以后的 listenToPort 内部很简单,为每一对地址+端口调用 anetTcpServer 创建一个 socket 套接字,并为其调用 listen 使其变为主动套接字。
创建监听事件
在 initServer 中,使用 createSocketAcceptHandler 为所有监听套接字创建文件事件,并且将 handler 设为 acceptTcpHandler。
 1
 2
 3
 4
 5
 6
 7
 8
 9
10
11
12
13
|
int createSocketAcceptHandler(socketFds *sfd, aeFileProc *accept_handler) {
    int j;

    for (j = 0; j < sfd->count; j++) {
        if (aeCreateFileEvent(server.el, sfd->fd[j], AE_READABLE, accept_handler, NULL) == AE_ERR) {
            /* Rollback */
            for (j = j - 1; j >= 0; j--)
                aeDeleteFileEvent(server.el, sfd->fd[j], AE_READABLE);
            return C_ERR;
        }
    }
    return C_OK;
}
|
createSocketAcceptHandler 的内部实现很简单,只是遍历了 sfd 中的所有套接字,使用 aeCreateFileEvent 为其创建文件事件。
 1
 2
 3
 4
 5
 6
 7
 8
 9
10
11
12
13
14
15
16
17
18
19
|
void acceptTcpHandler(aeEventLoop *el, int fd, void *privdata, int mask) {
    int cport, cfd, max = MAX_ACCEPTS_PER_CALL;
    char cip[NET_IP_STR_LEN];
    UNUSED(el);
    UNUSED(mask);
    UNUSED(privdata);

    while(max--) { // 单次唤醒只处理 1000 个
        cfd = anetTcpAccept(server.neterr, fd, cip, sizeof(cip), &cport);
        if (cfd == ANET_ERR) {
            if (errno != EWOULDBLOCK)
                serverLog(LL_WARNING,
                    "Accepting client connection: %s", server.neterr);
            return;
        }
        serverLog(LL_VERBOSE,"Accepted %s:%d", cip, cport);
        acceptCommonHandler(connCreateAcceptedSocket(cfd), 0, cip);
    }
}
|
anetTcpAccept 的作用是为 fd 执行 accept4,并且将客户端的 ip 写入 cip 中,端口写入 cport 中,然后返回客户端套接字 cfd。
使用 connCreateAcceptedSocket 为客户端创建了一个连接对象,并将它传给了 acceptCommonHandler 来进行 accept 之后的处理,这两个函数我们分开来说。
创建连接对象
先来看一下 connection 的结构内部。
 1
 2
 3
 4
 5
 6
 7
 8
 9
10
11
12
13
14
15
16
17
18
19
20
21
22
23
24
25
26
27
28
29
30
|
typedef struct ConnectionType {
    void (*ae_handler)(struct aeEventLoop *el, int fd, void *clientData, int mask);
    int (*connect)(struct connection *conn, const char *addr, int port, const char *source_addr, ConnectionCallbackFunc connect_handler);
    int (*write)(struct connection *conn, const void *data, size_t data_len);
    int (*writev)(struct connection *conn, const struct iovec *iov, int iovcnt);
    int (*read)(struct connection *conn, void *buf, size_t buf_len);
    void (*close)(struct connection *conn);
    int (*accept)(struct connection *conn, ConnectionCallbackFunc accept_handler);
    int (*set_write_handler)(struct connection *conn, ConnectionCallbackFunc handler, int barrier);
    int (*set_read_handler)(struct connection *conn, ConnectionCallbackFunc handler);
    const char *(*get_last_error)(struct connection *conn);
    int (*blocking_connect)(struct connection *conn, const char *addr, int port, long long timeout);
    ssize_t (*sync_write)(struct connection *conn, char *ptr, ssize_t size, long long timeout);
    ssize_t (*sync_read)(struct connection *conn, char *ptr, ssize_t size, long long timeout);
    ssize_t (*sync_readline)(struct connection *conn, char *ptr, ssize_t size, long long timeout);
    int (*get_type)(struct connection *conn);
} ConnectionType;

struct connection {
    ConnectionType *type;
    ConnectionState state; // 连接状态
    short int flags;
    short int refs;
    int last_errno;
    void *private_data; // 保存了 client
    ConnectionCallbackFunc conn_handler;
    ConnectionCallbackFunc write_handler; // 写数据的方法
    ConnectionCallbackFunc read_handler; // 读数据的方法
    int fd; // 保存了 fd
};
|
connection 是为了适应各种类型的连接协议而存在的一个中间结构体,它为上层提供了统一的连接操作接口。不要被 ConnectionType 中密密麻麻的方法吓到,它只是对一类连接的所有方法的封装而已,暂时不需要管它。
如果是像上文一样通过 accept 创建的连接,那么会使用 connCreateAcceptedSocket 来进行创建 connection。
 1
 2
 3
 4
 5
 6
 7
 8
 9
10
11
12
13
14
|
connection *connCreateSocket() {
    connection *conn = zcalloc(sizeof(connection));
    conn->type = &CT_Socket;
    conn->fd = -1;

    return conn;
}

connection *connCreateAcceptedSocket(int fd) {
    connection *conn = connCreateSocket();
    conn->fd = fd;
    conn->state = CONN_STATE_ACCEPTING;
    return conn;
}
|
这里可以看到,conn 的 type 被设为了一个全局变量 CT_Socket 的指针,在这个全局变量里,实现了刚刚 ConnectionType 中的所有方法。
创建客户端
在创建完 connection 以后,还使用了 acceptCommonHandler 进行了后续的处理,我们要关注的创建客户端对象也在这里。
 1
 2
 3
 4
 5
 6
 7
 8
 9
10
|
// 大量简化后的 acceptCommonHandler
static void acceptCommonHandler(connection *conn, int flags, char *ip) {
    client *c;

    /* Create connection and client */
    if ((c = createClient(conn)) == NULL) { // 创建 client
        connClose(conn); /* May be already closed, just ignore errors */
        return;
    }
}
|
只留下我们目前关注的代码,最重要的就是调用 createClient 来创建客户端了。
 1
 2
 3
 4
 5
 6
 7
 8
 9
10
11
12
13
14
15
16
17
18
19
|
// 大量简化后的 createClient
client *createClient(connection *conn) {
    client *c = zmalloc(sizeof(client));
    if (conn) {
        connEnableTcpNoDelay(conn); // 设置 TCP_NODELAY
        if (server.tcpkeepalive)
            connKeepAlive(conn,server.tcpkeepalive); // 设置 SO_KEEPALIVE
        connSetReadHandler(conn, readQueryFromClient); // 创建读取事件
        connSetPrivateData(conn, c); // 会将 client 设置到 conn 的 private_data 中
    }
    selectDb(c, 0); // 默认的 db 是 0
    uint64_t client_id;
    atomicGetIncr(server.next_client_id, client_id, 1); // 得到 client id
    c->id = client_id;
    c->conn = conn;
    if(conn)
        linkClient(c); // 将 client 加入到 server.clients 中
    return c;
}
|
同样省略了大幅的非关键代码以后,createClient 中需要关注的是以下几点。
- 对 conn 做了一些网络参数相关的设置
- 为 conn 创建文件事件
- 将 client 设为了 conn 的
private_data,解决了从 conn 找 client 的需求
- 客户端的默认 DB 为 0 号
- 客户端的 ID 通过累加一个原子变量产生
- conn 也被保存在了 client 的 conn 字段中
- client 被加入到了 server.clients 中
创建客户端读取事件
在创建客户端的时候,为它的 conn 执行了 connSetReadHandler 函数,并且将函数 readQueryFromClient 作为参数传入。这个函数是用来创建读取文件事件的。
 1
 2
 3
 4
 5
 6
 7
 8
 9
10
11
12
13
14
|
static int connSocketSetReadHandler(connection *conn, ConnectionCallbackFunc func) {
    if (func == conn->read_handler)
        return C_OK;

    conn->read_handler = func;
    if (!conn->read_handler) {
        aeDeleteFileEvent(server.el, conn->fd, AE_READABLE);
    } else {
        if (aeCreateFileEvent(server.el, conn->fd, AE_READABLE, conn->type->ae_handler, conn) == AE_ERR) {
            return C_ERR;
        }
    }
    return C_OK;
}
|
它为 conn 创建了一个读取事件,回调为 ae_handler,这个函数就不细说了,它大概就是根据触发的 mask,来执行 handler,如果是读取事件,则执行 read_handler。conn->red_handler 被设为了传入的参数 func,根据上层调用的地方可得,当 conn 为客户端连接时,这个 func 就是在架构图里多次出现的 readQueryFromClient 了。
IO 线程
创建线程
在服务器启动的时候,会调用 initThreadedIO 来创建 IO 线程。下面来看一下精简过的 initThreadedIO 函数代码。
 1
 2
 3
 4
 5
 6
 7
 8
 9
10
11
12
13
14
15
16
17
18
19
20
21
22
23
24
25
26
|
// 精简过的 initThreadedIO
void initThreadedIO(void) {
    server.io_threads_active = 0; /* We start with threads not active. */

    /* Indicate that io-threads are currently idle */
    io_threads_op = IO_THREADS_OP_IDLE; // 设置线程状态

    /* Spawn and initialize the I/O threads. */
    for (int i = 0; i < server.io_threads_num; i++) {
        /* Things we do for all the threads including the main thread. */
        io_threads_list[i] = listCreate(); // 为每个线程创建一个链表
        if (i == 0)
            continue; /* Thread 0 is the main thread. */

        /* Things we do only for the additional threads. */
        pthread_t tid;
        pthread_mutex_init(&io_threads_mutex[i], NULL); // 初始化每个线程的锁
        setIOPendingCount(i, 0); // 初始化每个线程的待处理计数
        pthread_mutex_lock(&io_threads_mutex[i]); // 锁上,后面有用
        if (pthread_create(&tid, NULL, IOThreadMain, (void *)(long)i) != 0) {
            serverLog(LL_WARNING, "Fatal: Can't initialize IO thread.");
            exit(1);
        }
        io_threads[i] = tid; // 记录线程 id
    }
}
|
函数按照配置的数量创建了 IO 线程,需要注意的是主线程也是一个 IO 线程,需要将配置设为 >=2 才是真正的多线程。
线程执行的函数是 IOThreadMain,为每个线程创建的锁被直接锁上了,这个原因后面会讲到。
1
2
3
|
static inline void setIOPendingCount(int i, unsigned long count) {
    atomicSetWithSync(io_threads_pending[i], count);
}
|
setIOPendingCount 的内容很简单,就是使用原子方法将线程对应的待处理客户端数量设置为参数指定的值。
线程控制全局变量
在上面创建线程的代码中,与 IO 线程有关的五个全局变量已经悉数登场。
io_threads 保存了线程 index 到 id 的映射关系io_threads_mutex 保存了各个线程的锁io_threads_pending 保存了各个线程中待处理的客户端数量io_threads_op IO 线程状态,或者叫线程当前的操作io_threads_list 保存了线程中所有待处理的客户端
后三个尤其重要,会在很多地方看到使用它们。
IO 线程主函数
上面创建线程的部分有提到,创建出来的 IO 线程执行的函数是 IOThreadMain,下面来看一下精简过后的函数源码。
 1
 2
 3
 4
 5
 6
 7
 8
 9
10
11
12
13
14
15
16
17
18
19
20
21
22
23
24
25
26
27
28
29
30
31
32
33
34
35
36
37
|
void *IOThreadMain(void *myid) {
    long id = (unsigned long)myid;
    while(1) {
        /* Wait for start */
        for (int j = 0; j < 1000000; j++) {
            if (getIOPendingCount(id) != 0)
                break;
        }

        /* Give the main thread a chance to stop this thread. */
        if (getIOPendingCount(id) == 0) { // 如果要待处理的客户端数量为 0
            pthread_mutex_lock(&io_threads_mutex[id]); // 阻塞在这里
            pthread_mutex_unlock(&io_threads_mutex[id]);
            continue;
        }

        serverAssert(getIOPendingCount(id) != 0);

        /* Process: note that the main thread will never touch our list
         * before we drop the pending count to 0. */
        listIter li;
        listNode *ln;
        listRewind(io_threads_list[id], &li); // 拿到线程分到的待处理客户端
        while((ln = listNext(&li))) {
            client *c = listNodeValue(ln);
            if (io_threads_op == IO_THREADS_OP_WRITE) {
                writeToClient(c, 0);
            } else if (io_threads_op == IO_THREADS_OP_READ) {
                readQueryFromClient(c->conn);
            } else {
                serverPanic("io_threads_op value is unknown");
            }
        }
        listEmpty(io_threads_list[id]); // 清空链表
        setIOPendingCount(id, 0); // 设置本线程等待的数量为 0
    }
}
|
线程在创建好以后会阻塞在 io_threads_mutex 对应的自己的锁上。当加锁成功以后,立即释放,检查等待处理的客户端数量,如果不为 0,则从链表中依次拿取客户端,根据目前 IO 线程的动作来调用 writeToClient 进行写或者调用 readQueryFromClient 进行读。
当全部处理完以后,清空链表,并且将等待处理的数量设为 0,然后继续循环。但是这里不用担心,如果没有足够的工作,那么 IO 线程会马上再次阻塞在 mutex 上,后面再讲。
使用 IO 线程读取
如果大家对一开始的图还有印象的话,那么有两个名字巨长的函数可能你还记得,其中有一个就是 handleClientsWithPendingReadsUsingThreads,它被用来使用多线程读取数据。
 1
 2
 3
 4
 5
 6
 7
 8
 9
10
11
12
13
14
15
16
17
18
19
20
21
22
23
24
25
26
27
28
29
30
31
32
33
34
35
36
37
38
39
40
41
42
43
44
45
46
47
48
49
50
51
52
53
54
55
56
57
58
59
60
61
62
63
64
65
66
67
68
69
70
71
72
73
|
int handleClientsWithPendingReadsUsingThreads(void) {
    if (!server.io_threads_active || !server.io_threads_do_reads)
        return 0;
    int processed = listLength(server.clients_pending_read);
    if (processed == 0)
        return 0;

    // 划分每个线程负责的链表
    listIter li;
    listNode *ln;
    listRewind(server.clients_pending_read, &li);
    int item_id = 0;
    while((ln = listNext(&li))) {
        client *c = listNodeValue(ln);
        int target_id = item_id % server.io_threads_num;
        listAddNodeTail(io_threads_list[target_id],c);
        item_id++;
    }

    io_threads_op = IO_THREADS_OP_READ; // 修改线程操作
    for (int j = 1; j < server.io_threads_num; j++) {
        int count = listLength(io_threads_list[j]);
        setIOPendingCount(j, count); // 设置线程待处理数量
    }

    /* Also use the main thread to process a slice of clients. */
    listRewind(io_threads_list[0],&li); // 主线程默认使用第一个链表
    while((ln = listNext(&li))) {
        client *c = listNodeValue(ln);
        readQueryFromClient(c->conn);
    }
    listEmpty(io_threads_list[0]);

    // 等待所有线程的任务执行完毕
    while(1) {
        unsigned long pending = 0;
        for (int j = 1; j < server.io_threads_num; j++)
            pending += getIOPendingCount(j);
        if (pending == 0) break;
    }

    io_threads_op = IO_THREADS_OP_IDLE; // 重新修改线程动作

    /* Run the list of clients again to process the new buffers. */
    while(listLength(server.clients_pending_read)) {
        ln = listFirst(server.clients_pending_read);
        client *c = listNodeValue(ln);
        listDelNode(server.clients_pending_read,ln);
        c->pending_read_list_node = NULL;

        serverAssert(!(c->flags & CLIENT_BLOCKED));

        if (beforeNextClient(c) == C_ERR) {
            continue;
        }

        updateClientMemUsage(c);

        // 执行所有等待执行的客户端的命令
        if (processPendingCommandAndInputBuffer(c) == C_ERR) {
            continue;
        }

        // 如果需要回复,则将客户端加入 clients_pending_write 中
        if (!(c->flags & CLIENT_PENDING_WRITE) && clientHasPendingReplies(c))
            putClientInPendingWriteQueue(c);
    }

    /* Update processed count on server */
    server.stat_io_reads_processed += processed;

    return processed;
}
|
这函数挺长,但是也没什么好精简的,233。在一开始会将 clients_pending_read 中所有待处理客户端按照线程数量进行分割,分割结果写到 io_threads_list 对应线程的链表里。
修改 io_threads_op 为 IO_THREADS_OP_READ 告知 IO 线程接下来是做读取操作。为每个线程修改它待处理的客户端数量。主线程也作为 IO 线程,使用 0 号链表。
主线程执行完毕以后,会进入一个死循环,不断检查各个线程剩余的数量,直到总数量为 0,此时所有线程的任务都已经执行完毕了。再将 io_threads_op 修改为 IO_THREADS_OP_IDLE。
多线程状态下的 readQueryFromClient 并不会直接执行指令,而是仅仅读取指令到客户端的缓冲区中。接下来在主线程中,遍历所有 clients_pending_read 中的客户端,为它们执行 processPendingCommandAndInputBuffer 执行它们需要的命令,如果它们执行的结果需要返回,那么会将其加入到 clients_pending_write 中。
需要特别注意的是,只有在两次修改 io_threads_op 之间的操作是多线程的,执行命令的部分都是在主线程中进行的。
IO 线程的停止与启动
当 Redis 的命令不多时,此时留着 IO 线程空转就太不环保了。Redis 中机制来对 IO 线程进行开启和关闭。
当每次调用 handleClientsWithPendingWritesUsingThreads 的时候,会执行一个叫做 stopThreadedIOIfNeeded 的函数,看名字就直到它是用来判断是否要关闭 IO 线程的。
 1
 2
 3
 4
 5
 6
 7
 8
 9
10
11
12
13
14
15
|
int stopThreadedIOIfNeeded(void) {
    int pending = listLength(server.clients_pending_write);

    /* Return ASAP if IO threads are disabled (single threaded mode). */
    if (server.io_threads_num == 1)
        return 1;

    if (pending < (server.io_threads_num * 2)) {
        if (server.io_threads_active)
            stopThreadedIO();
        return 1;
    } else {
        return 0;
    }
}
|
它判断的标准是,如果当前等待写的客户端不到 IO 线程数量的 2 倍,则应该关闭 IO 线程。关闭 IO 线程调用的是 stopThreadedIO。
1
2
3
4
5
6
7
|
void stopThreadedIO(void) {
    handleClientsWithPendingReadsUsingThreads();
    serverAssert(server.io_threads_active == 1);
    for (int j = 1; j < server.io_threads_num; j++)
        pthread_mutex_lock(&io_threads_mutex[j]);
    server.io_threads_active = 0;
}
|
在关闭之前最后执行了一个多线程读,然后对每个线程的锁加锁,使所有 IO 线程都重新被阻塞在自己的锁上,等待下一次唤醒。
同样是在 handleClientsWithPendingWritesUsingThreads 中,如果当待处理写的客户端数量超过了 IO 线程的 2 倍,则会调用 startThreadedIO 让 IO 线程重新开始运行。
1
2
3
4
5
6
|
void startThreadedIO(void) {
    serverAssert(server.io_threads_active == 0);
    for (int j = 1; j < server.io_threads_num; j++)
        pthread_mutex_unlock(&io_threads_mutex[j]);
    server.io_threads_active = 1;
}
|
startThreadedIO 的操作很简单,只需要解锁所有线程的锁即可让它们重新恢复运行。
无锁实现
得益于 Redis 的设计,整个网络模型中是没有锁的。这样就无需修改底层的数据结构,不然要为每个结构都加上锁,影响会很大。接下来来看一下 Redis 是怎么实现无锁的。
首先是全局变量 io_threads_list,它保存了主线程对所有客户端分配的结果链表,它在一开始分配的时候,IO 线程还都没有在执行。当它分配完毕以后,主线程不会再修改它,直到 IO 线程的任务执行结束的时候由 IO 线程自己将链表清空。所以并不存在对 io_threads_list 的并行读写。
全局变量 io_threads_pending 保存了所有线程当前剩余的未处理客户端个数,这个数组主线程和 IO 线程都是需要读写的,但是它是个原子变量数组,各个线程操作它都是使用的原子方法,故不影响并行读写。
对于全局变量 io_threads_op 来说,它保存了当前线程的执行状态,但是它也是主线程和 IO 线程错开读写的,主线程设置好它以后,IO 线程才开始执行,当 IO 线程都执行完毕以后,主线程才再次修改它。
至于为什么执行命令的时候不需要对被操作的数据加锁,这个其实上面已经解释过了。命令的读取是多线程的,但是命令的执行永远都是单线程的,只有主线程中会真正执行命令。
总结
那么,Redis 的多线程网络模型分析就到此结束了。可以看到在设计中为了不引入锁,其实做了很多妥协。本质上来说目前 Redis 的多线程还不能算是真正的多线程。
后面可能会继续写 Redis 的各种数据结构的分析。